Advice & Inspiration
Related articles


Planting Pear Trees: UK Grower’s Guide

What’s not to love about pear trees? They’re so straightforward to grow that they make a brilliant choice of first tree if you’re just starting out. According to our fruit tree grower, John, “they’re one of the easiest and most reliable and they tend to be resistant to the diseases that a lot of fruit trees struggle with”.
As well as being hard as nails, they get to work fast too, producing fruit at just three years old - which means if you choose one of our two year old pear trees, you could see fruit the summer after planting. Here’s how to get that lovely new pear tree off to the best possible start, keep it in top condition and harvest your well earned crops!
Jump to:
- Growing a pear tree from seed
- When is the best time to plant pear trees?
- What's the best soil for pear trees?
- How to plant a pear tree
- Pear tree water requirements
- Pear tree feeding needs
- Self fertile pear trees
- Growing pear trees in pots
- Pruning pear trees
- Training pear trees
- Problems with pear trees
- Harvesting pears from pear trees
- Pear tree growth rate
How to grow a pear tree from seed
It’s possible to grow a pear tree from seed, but bear in mind that the tree you grow will not necessarily be the same as its parent variety, and may not produce any decent fruit. Pears grown from seed also take at least five years before they flower, so it’s best to look at this as a fun experiment rather than a fast track to your own orchard. If that’s ok with you, here’s how:
First, float some pear seeds in water - any that float are no good; you want the seeds that sink to the bottom. Next, you’ll need to stratify the seeds, as they need a period of cold to mimic winter conditions and prepare them for germination. You can do this by placing your seeds in a bag of damp moss, sand or kitchen towel and leaving them in the fridge for about eight weeks.
The next step is to soak the seeds in water for 24 hours, to soften their coats and help them absorb moisture from the soil.
Plant each seed 2.5cm deep in a pot of well draining compost or garden soil, then cover them up and place the pots in a warm, sunny spot (a windowsill is ideal), watering to keep the soil consistently moist but not waterlogged. After several weeks you should start to see shoots.
When the pear seedlings are large enough to be handled and have a few pairs of leaves, you can pot them on into larger containers or harden them off and plant them in the garden.
If you want your pears sooner, you’ll need to get hold of a bare root or potted pear tree grafted onto a rootstock. This way of growing guarantees that you’ll get a strong tree that’s exactly the size and variety you want.

The best time to plant pear trees
The ideal time to plant your pear tree is on a mild, dry day in autumn or winter, but you do have a bit of leeway with this. Bare root trees can be planted at any time between November and March, while they’re dormant and potted trees can be planted all year round.
Having said that, it’s best to avoid planting on a day when the weather is hot and dry or the ground is frozen or waterlogged. Any of these weather conditions will stress the young tree and force it to put its energy into dealing with them, when what you really want is for it to focus on growing a nice root system.

The best soil for pear trees
Pear trees are not hugely fussy about soil types, and will even be fine in clay soil, as long as it’s mixed with a bit of compost or gravel to improve the drainage. Digging in some compost (or well rotted manure) at the time of planting is generally a good idea, to boost the soil’s nutrients and give your pear tree an advantage.
Pear trees can be grown in partial shade, but they do best in a sunny, sheltered spot with at least six hours of sunlight daily, such as a border next to a wall or fence, a sheltered lawn or a patio pot.

Planting a pear tree
Bare root pear trees should be planted as soon as possible after they arrive with you. When you’re ready, soak the roots in a bucket of water for an hour or so, then follow the steps as below.
For potted pear trees, skip the soaking and dig a hole large enough for your tree’s roots to spread out. This should be about as deep as the root ball and twice as wide. Remove your tree from the nursery pot or ecowrap, and place it securely in the centre of the hole. Mix some compost with the soil you dug out, then fill in the hole, firming the soil down around the tree.
Finally, give your tree a good watering and add a layer of mulch to keep moisture in the soil and reduce weeds. If you’re planting more than one pear tree, leave at least 3m between them to allow for spreading (check individual tree pages for the exact measurements).
How much water do pear trees need?
A newly planted pear tree needs regular watering for its first year, after which it’ll have established a nice deep root system and you can ease off. Keep watering weekly throughout the growing season (spring and summer), especially in hot and dry spells, and the great British weather will take care of the rest.
If your pear tree is in a pot it will need more regular watering, as the soil in pots dries out quicker. Watering at the base of the tree will avoid splashing the leaves and help prevent mould and mildew developing.

Do pear trees need feeding?
Pear trees don’t strictly need any fertiliser, but it can help boost their flowering and fruit production, especially if they’re newly planted or in pots. Feed your tree in spring, with a general purpose or nitrogen rich plant food and in autumn or winter, apply a fresh layer of mulch which will help to protect the tree’s roots during colder weather.

Do you need a self fertile pear tree?
Most pear trees are partially self fertile, which means that they can produce a crop by themselves, but will produce more fruit with a different pear tree as a pollination partner.
Does this mean you need two pear trees? Probably not. If you live in an area where there’s likely to be another pear tree within a mile, they’ll be able to fertilise each other courtesy of pollinating insects. You’ll only really need to consider a partner for your tree if you live in a very remote area without gardens or wild pear trees nearby.

Can you grow pear trees in pots?
A pear tree is a good choice for a pot, particularly if it’s described as patio (which will be on a dwarf or semi dwarf rootstock) or cordon (which has been trained for more compact growth).
You can actually grow any pear tree in a container, but those on more vigorous rootstocks will need more regular pruning and to be repotted every couple of years into a larger container.
We’d recommend Conference pear in cordon or patio form, or Concorde, which has naturally more compact growth than many varieties. Choose a container at least 60cm wide and deep with drainage holes in the bottom and check the soil regularly to prevent it drying out.

How to prune a pear tree
Pruning your pear tree once a year can help it to be healthy, productive and well shaped. The time to do this is in the dormant season between November and March, when the tree isn’t in active growth and you can see the shape of the tree better.
First of all, prune out any dead, diseased or damaged branches, and any that are crossing or growing inwards. Something to bear in mind is that pear wood is relatively soft and if the tree crops heavily, branches left too long can break under the weight of the fruit. To prevent this happening, trim all but the main branches, cutting down to about six buds on each stem.
Established trees over two years old can have their branches trimmed back by up to a third each year, to keep the tree at a manageable size.

Training pear trees
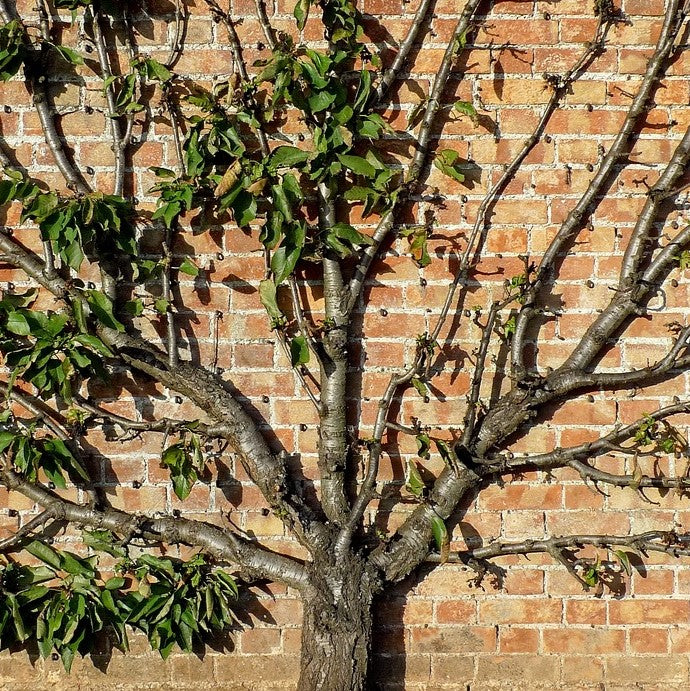
If you fancy being a bit, well, fancy, why not have a go at training your pear tree into shape? Training trees isn’t just for impressing the neighbours, it can help them be healthier and more productive, as well as saving space. Pear trees are very versatile when it comes to training, and can be grown as espaliers, cordons, fans or half standards.

Pear tree problems
Pear trees are native to the UK, so as you’d expect, they’re amongst the hardiest and most trouble free fruit trees you can grow. If a problem does arise, however, it’s useful to be able to spot it early and stop it getting worse.
Pear scab
If you find dark coloured blotches on the fruit, blisters on the leaves and cracked twigs, you might be staring down a case of pear scab. It’s caused by an airborne fungus which spreads via fallen leaves. Mild cases of scab shouldn’t stop you eating the fruit - just peel the skin off where it’s affected and the flesh should be fine underneath.
You can prevent scab from spreading by pruning out any infected leaves and twigs, and picking the fruit, as well as raking up any fallen leaves and binning them. Although this won’t entirely eliminate scab, it will reduce the amount of the fungus and mean that any infection the following year will be lessened.
Blossom wilt and brown rot
These two baleful infections are caused by the same fungus. Blossom wilt starts first, with shrivelled, brown blossom and small brown pustules on the dead vegetation. It can then spread to the fruit, leaving it, well, brown and rotten.
The main risk of blossom wilt is that the tree might not be pollinated and you’ll get no fruit. It can also cause shoots and twigs to die back. If you see blossom wilt or brown rot, remove any of the affected parts of the tree including fruit and flowers and dispose of these in a landfill bin, not in compost.
Fire blight
Fire blight also attacks the blossom of fruit trees, and is at large between spring and early autumn. It’s a bacterial infection that causes wilted or dead blossom, white ooze, shrivelled or dead shoots and cankers (sunken patches of dead wood). The name comes from the appearance of severely affected trees, which are said to look like they’ve been scorched by fire.
This is another disease that you’ll need to prune out, making sure to get rid of all infected parts of the tree and to disinfect your tools between each cut. Fireblight is sometimes transmitted from hawthorns, so be extra vigilant if you have any in your garden.
Aphids
These familiar tiny green insects like to hide under leaves and cluster around the joints of young stems and branches. Although they feed on tree sap, they’re relatively harmless in small numbers. If you do have large populations though, the sticky residue they excrete can lead to mould developing.
To keep aphids away, it’s a good idea to encourage their natural predators, which include ladybirds, hoverflies and lacewings, with companion planting. For a short term fix, you can also wipe them off with a damp cloth, blast them off with a hosepipe or spray the affected areas with a soap and vegetable oil spray.
Pear leaf blister mite
These are microscopic insects (just 0.2mm long) which feed on sap from the leaves of pear trees. Their excreta causes pink or orange raised bumps on the leaves in spring, which can turn darker towards summer. The bad news? Your tree will look pretty sub-par, as it can affect all of the leaves.
The good news, however, is that this is a relatively benign pest which won’t affect the fruit or the general health of your tree. You can prune out the affected leaves, but as this may weaken your tree more than the actual mites, it’s probably best to just tolerate them.

Harvesting
Pear varieties differ, so depending on which one you have, you can expect your pears to ripen between August and October. They need to be picked before they’re fully ripe, as if you leave them, they’ll ripen from the inside out, making the texture of the fruit mushy or grainy.
Once your pears are full sized, hold one in your hand and lift it up gently, twisting as you go. If the fruit comes away easily, it’s ready to pick. Softer pears should be eaten straight away, but the firm ones will ripen in a fruit bowl after a couple of days.
Pears will keep for 3-4 days, depending on ripeness, or for up to 12 days in the fridge. To keep your pears for longer, you can freeze them: peel and quarter or slice your pears, then lay them out on a baking tray in a single layer and put them in the freezer for a few hours.
After this, they can be transferred to a freezer bag or container and kept for about a year. Defrosted pears will be quite soft in texture, so they’re best used for smoothies or cooking in recipes like crumbles and compotes.

How fast do pear trees grow?
Pear trees grow at a moderate speed, taking around 5-7 years to reach their mature size. In the right conditions, they can live and produce fruit for decades.
They typically take 3-5 years to fruit and vary in height from about 2.5m for semi dwarfing trees and 12m for the largest and most vigorous trees. Most pear trees are grafted on Quince A rootstock which means they’ll grow to a maximum of 3.5-4m tall, but any pear tree can be pruned to fit your space.
Of course all of these things can vary according to where you live, what the growing conditions are like and the variety of your tree. Want to make sure you choose the right pear tree for your garden? Here’s all the info you need.


